🔥 10/29 화요일 목표 🔥
🔎 개인 프로젝트 필수구현 완료(동적환경조사, 점프대, 아이템 사용)
📌 동적환경조사
👀 ItemObject Script
public class ItemObject : MonoBehaviour, IInteractable
{
    public ItemData data;

    public string GetInteractPrompt()
    {
        string str = $"{data.displayName}\n\n{data.description}";
        return str;
    }

    public void OnInteract()
    {
        CharacterManager.instance.Player.itemData = data;
        CharacterManager.instance.Player.addItem?.Invoke();
        Destroy(gameObject);

    }
}
👀 Interaction Script
public class Interaction : MonoBehaviour
{
    public float checkRate = 0.05f;
    public float lastCheckTime;
    public float maxCheckDistance;
    public LayerMask layerMask;

    public GameObject curInteractGameObject;
    private IInteractable curInteractable;

    public TextMeshProUGUI promptText;
    private Camera camera;

    private void Start()
    {
        camera = Camera.main;
    }
    private void Update()
    {
        if (Time.time - lastCheckTime > checkRate)
        {
            lastCheckTime = Time.time;

            Ray ray = camera.ScreenPointToRay(new Vector3(Screen.width / 2, Screen.height / 2));
            RaycastHit hit;

            if (Physics.Raycast(ray, out hit, maxCheckDistance, layerMask))
            {
                if (hit.collider.gameObject != curInteractGameObject)
                {
                    curInteractGameObject = hit.collider.gameObject;
                    curInteractable = hit.collider.GetComponent<IInteractable>();
                    SetPromptText();
                }
            }
            else
            {
                curInteractGameObject = null;
                curInteractable = null;
                promptText.gameObject.SetActive(false);
            }
        }

    }
    private void SetPromptText()
    {
        promptText.gameObject.SetActive(true);
        promptText.text = curInteractable.GetInteractPrompt();
    }

    public void OnInteractInput(InputAction.CallbackContext context)
    {
        if (context.phase == InputActionPhase.Started && curInteractable != null)
        {
            curInteractable.OnInteract();
            curInteractGameObject = null;
            curInteractable = null;
            promptText.gameObject.SetActive(false);
        }
    }

}
📌 점프대
👀 Player Script
AddForce로 ForceMode.Impulse를 통해 Velocity 값을 순간적으로 높여줌.
<참고 : Rigidbody - ForceMode종류 > 👉🏻 2024.10.24 - [Unity] - Unity 게임 개발 숙련 - (6주차1일)
private float jumpZoneJumpForce = 200f;

private void OnCollisionEnter(Collision collision)
{
    if (collision.gameObject.layer == LayerMask.NameToLayer("JumpSpot"))
    {
        rigidbody.AddForce(Vector3.up * jumpZoneJumpForce, ForceMode.Impulse);
    }
}
📌 인벤토리 만들기
👀 UIInventory 기본구성

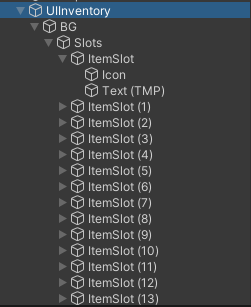
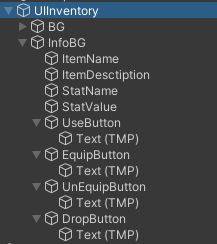
👀 UIInventory Script
public class UIInventory : MonoBehaviour
{
    public ItemSlot[] slots;
    public GameObject inventoryWindow;
    public Transform slotPanel;

    [Header("Select Item")]
    public TextMeshProUGUI selectedItemName;
    public TextMeshProUGUI selectedItemDescription;
    public TextMeshProUGUI selectedStatName;
    public TextMeshProUGUI selectedStatValue;

    public GameObject useButton;
    public GameObject equipButton;
    public GameObject unequipButton;
    public GameObject dropButton;

    private PlayerController controller;
    private PlayerCondition condition;

    void Start()
    {
        controller = CharacterManager.Instance.Player.controller;
        condition = CharacterManager.Instance.Player.condition;

		controller.inventory += Toggle; //델리게이트 Action추가

        inventoryWindow.SetActive(false);
        slots = new ItemSlot[slotPanel.childCount];//childCount!!!!

        for (int i = 0; i < slots.Length; i++)
        {
            slots[i] = slotPanel.GetChild(i).GetComponent<ItemSlot>();
            slots[i].index = i;
            slots[i].inventory = this;
        }

        ClearSelectedItemWindow();
    }

    void ClearSelectedItemWindow() //초기화
    {
        selectedItemName.text = string.Empty;
        selectedItemDescription.text = string.Empty;
        selectedStatName.text = string.Empty;
        selectedStatValue.text = string.Empty;

        useButton.SetActive(false);
        equipButton.SetActive(false);
        unequipButton.SetActive(false);
        dropButton.SetActive(false);
    }
    public void Toggle()
    {
        if (IsOpen())
        {
            inventoryWindow.SetActive(false);
        }
        else
        {
            inventoryWindow.SetActive(true);
        }
    }
    public bool IsOpen()
    {
        return inventoryWindow.activeInHierarchy;
    }

}
⭐Transform으로 slotPanel을 선언 하면, 자식을 childCount로 가져올수 있음.
IsOpen메서드로 하이어라키창에 인벤토리가 켜져있는지를 Bool값으로 반환함.
Toggle() 에서
IsOpen = true일때, 꺼줌
IsOpen = false일때, 켜줌
👀 PlayerController Script 수정
public bool canLook = true; //마우스커서확인 Bool값
public Action inventory;//델리게이트로 Action추가

private void LateUpdate()
{
    if (canLook)
    {
        CameraLook();
    }
}

public void OnInventory(InputAction.CallbackContext context)
{
    if (context.phase == InputActionPhase.Started)
    {
        inventory?.Invoke();
        ToggleCursor();
    }
}
void ToggleCursor()
{
    bool toggle = Cursor.lockState == CursorLockMode.Locked;
    Cursor.lockState = toggle? CursorLockMode.None : CursorLockMode.Locked;
    canLook = !toggle;
}
인벤토리 내용이해하고 한번 더 정리하기
controller.inventory += Toggle;
inventory?.Invoke(); 이후,
📌 아이템사용
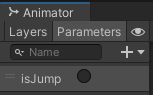
📌 애니메이션 추가
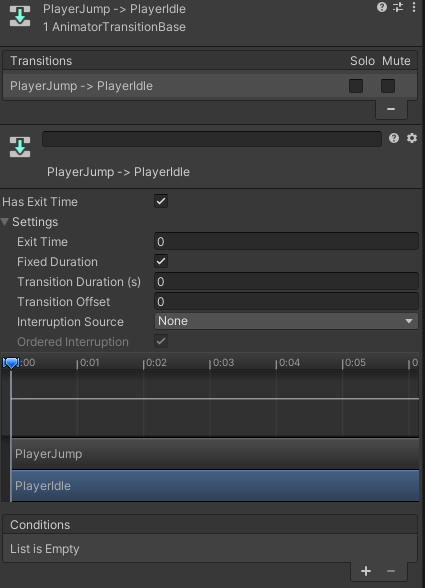
애니메이션 Trigger Parameter Setting
Jump Key를 눌렀을때 바로 작동할 수 있도록, Has Exit Time은 꺼준다.
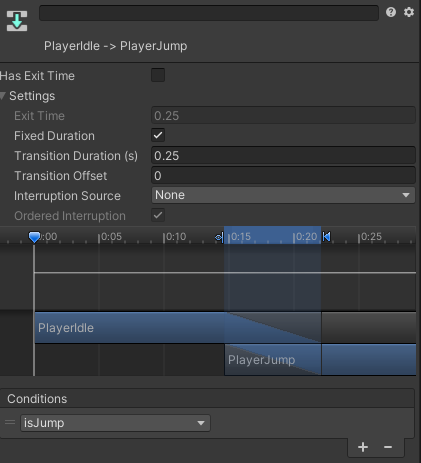
Jump Animation이 끝나면 자동으로 Idle 상태로 돌아오기 위해, Has Exit Time을 켜준다.
👀 PlayerController Script 에 아래의 내용을 추가해준다
 private Animator animator;
 void Awake()
{
    animator = GetComponent<Animator>();
}
public void OnJump(InputAction.CallbackContext context)
{
    if (context.phase == InputActionPhase.Started && IsGrounded())
    {
        rigidbody.AddForce(Vector2.up * jumpPower, ForceMode.Impulse);
        animator.SetTrigger("isJump");
    }
}
👀 Walk Animation 넣기 + Run InputSystemAction 추가하기 + Run Animation넣기
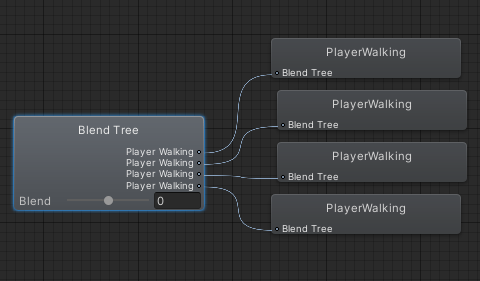
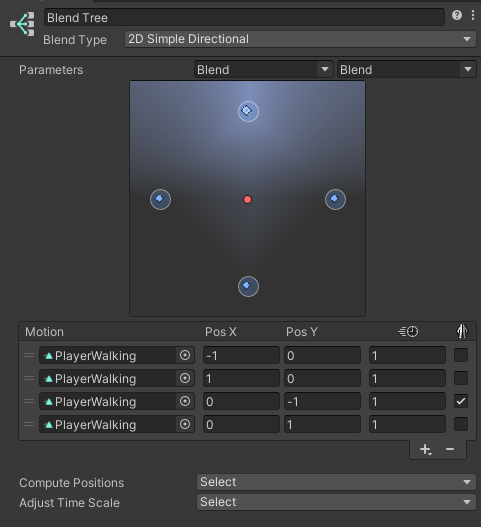
👀 Move 블랜드 트리 만들어서 사용 해보기
현재는 Walk Animation이 모두 동일 하여, 뒤로 갈때의 플립기능만 사용함.
나중에 시간이 많다면, 왼쪽으로 걷는 애니메이션도 추가해 오른쪽 플립 기능을 사용 해도 좋을것 같다.
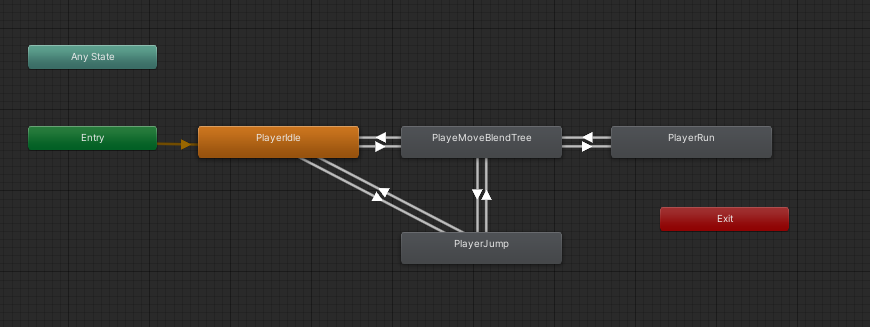
❓ 현재 걷기 키를 누른 상태로 점프하기로 바로 넘어가지지 않는 문제 발생
💡 유한상태머신에서 Move에서도 Jump로 넘어 갈 수 있도록 조건을 추가 해줌으로써 해결됨.
📌 시네머신으로 3인칭카메라
👀 CameraController Script
카메라컨테이너에 스크립트를 붙여주고, PlayerInputSystemAction에 VKey로 줌Action추가
아래와 같이 게임오브젝트를 인스펙터에서 카메라를 드래그앤 드롭으로 붙여넣어준다.
public class CameraController : MonoBehaviour
{

    [SerializeField] private GameObject mainCam;
    [SerializeField] private GameObject thirdCam;


    public void ZoomInOutView(InputAction.CallbackContext context)
    {
        if (context.phase == InputActionPhase.Started && mainCam.activeSelf == true)
        {
            mainCam.SetActive(false);
            thirdCam.SetActive(true);
        }
        else if (context.phase == InputActionPhase.Started && thirdCam.activeSelf == true)
        {
            thirdCam.SetActive(false);
            mainCam.SetActive(true);
        }
    }
}
👀 InputActionPhase
Started: 입력이 시작되었음을 나타낸다.
Performed: 입력이 완료되었음을 나타낸다.
Canceled: 입력이 취소되었음을 나타낸다.
Waiting: 입력이 대기 중임을 나타낸다.
Disabled: 입력이 비활성화되었음을 나타낸다.
나는 토글형식을 원해 눌렀을때 작동 할 수 있도록,
두 조건 모두 Started를 넣어주고,
하나의 캠이 켜져있으면 조건내부로 들어가
현재 켜져있는 캠을 꺼주고, 다른 캠을 켜주도록 구현했다.
사실 위의 토글 코드보다 훨씬 간단한데..
최적화는 잘 모르겠다^-^
🔥 10/30 수요일 목표 🔥
🔎 개인 프로젝트 ReadMe작성해보기
🔎 개인 프로젝트 제출하기
'Unity 내배캠 TIL' 카테고리의 다른 글
| Unity 게임 개발 숙련 - 팀프로젝트(7주차 2일) (0) | 2024.11.08 |
|---|---|
| Unity 게임 개발 숙련 - 팀프로젝트(7주차 1일) (0) | 2024.11.08 |
| Unity 게임 개발 숙련 - (6주차4일) (0) | 2024.10.29 |
| Unity 게임 개발 숙련 - (6주차3일) (1) | 2024.10.25 |
| Unity 게임 개발 숙련 - (6주차2일) (0) | 2024.10.24 |